Main Menu
- Home
- Product Finder
- Calibration Systems
- Calibration Services
- Digital Sensing
- Industrial Vibration Calibration
- Modal and Vibration Testing
- Non-Destructive Testing
- Sound & Vibration Rental Program
- Learn
- About Us
- Contact Us
Remember the old saying, "Trust But Verify?" This is an extremely applicable axiom in relation to dynamic calibration. It is a good policy to have a number of layers of verification integral to both the calibration system and the operation process.
The first thing to remember is that dynamic sensor calibration is an act of verification in itself. In the world of piezoelectric accelerometers and precision condenser microphones, there are no adjustments to make. The act of dynamic calibration is a validation that the sensor maintains its integrity with a stable output in magnitude and phase with respect to frequency, and also linearity across its full input amplitude range. Given that the sensitivity of an accelerometer "is what it is," part of a complete quality assessment of the sensor performance and integrity is an evaluation of the stability over longer periods of time. Ideally, the metrology lab maintains a history over years of calibrating the same assets, and that each asset's individual history is assessed as part of the inspection. This can be important because checking a sensor just to its specifications may not show the entire picture. For example, an accelerometer that has nominal sensitivity of 100 mV/g can range from 95 mV/g to 105 mV/g with a typical +/-5% tolerance specification. If the specific asset exhibits a sensitivity of 104.5 mV/g at the time of original manufacture, then this asset should maintain a sensitivity near the model type's expected long-term stability specification. If after 1 year the sensitivity is measured as 95.5 mV/g (nearly a 10% drop!) then the asset could be passed as within tolerance (+/-5% from 100 mV/g), although, clearly, this transducer has changed substantially and is suspect.
To ensure the confidence and validity in the system performing this calibration, it is a strongly recommended practice to maintain and run a verification SUT calibration of the calibration system every day the system is used. Remember that when a sensor or system fails calibration, EVERY measurement made since the previous valid system verification is suspect and subject to revalidation or to recall...which is a costly, painful process and a certain detractor to the reputation of any calibration or test laboratory. Verification on a daily basis with a controlled, known asset, provides confidence in the system performance.
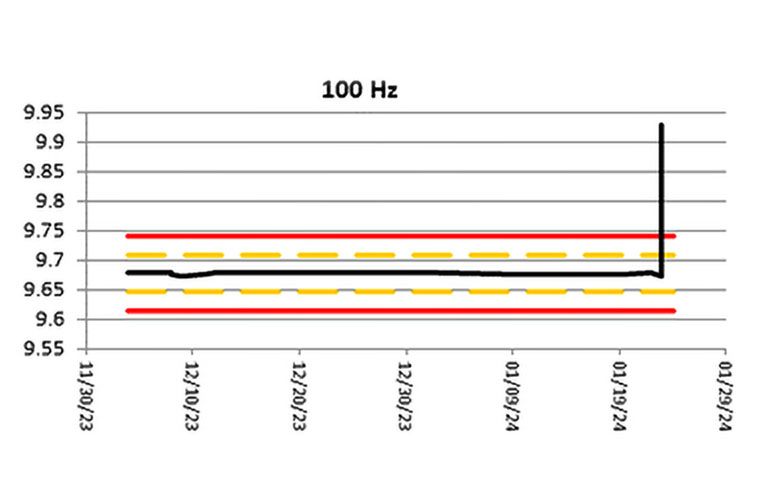
We also recommend a monthly review of daily verification data, displayed as a scatter plot over time, that can clearly show any unacceptable levels of random uncertainties related to operators, their technique, or the environment, as well as any drifting systemic biases. These situations may be less clear if viewed as single data points at single moments in time. See Figure 1 below for an example of data that indicates a potential issue.

Figure 1. Shift of verification sensor data at 100 Hz compared to historical data. This indicates that there is an issue that needs to be investigated. This issue might be systemic or operator-related.
A second layer of "Trust But Verify," is a periodic review of calibration and quality system practices by self-audit. A schedule of self-audits and closed-loop corrective/root-cause/preventative actions is required by any organization certified to either ISO 9001 or ISO 17025. Most important to remember with self-audits is that they are NOT a necessary compliance evil, but rather an investment in continuous improvement. Use audit time as "teachable moments" where gray areas can be used for dialog/education and gaps can be addressed with training or improved structure.
Proficiency testing of vibration calibration through inter-laboratory comparisons is another means of comparison testing and double checking your calibration system, procedures and skills. The practice of a test, comparison and dialog with other capable laboratories builds both confidence and additional knowledge.
The combination of quality equipment, along with proper test procedures and control are the backbone of reliable calibrations. Remembering that people, processes, equipment and environments are subject to change, provides the motivation for the different checks and validations needed to ensure successful and stable operation over the long term. If you have questions about any of the methods or means described here, give us a call. We are happy to help answer any questions.