Main Menu
- Home
- Product Finder
- Calibration Systems
- Calibration Services
- Digital Sensing
- Industrial Vibration Calibration
- Modal and Vibration Testing
- Non-Destructive Testing
- Sound & Vibration Rental Program
- Learn
- About Us
- Contact Us
The accelerometer has largely supplanted all other types of transducers for vibration measurements. This wide-spread use has been satisfied by several sensing technologies including piezoelectric, piezoresistive, capacitive, and servo. Accordingly, hundreds of thousands of these accelerometers are used each year.
In some applications, calibration is not needed. Amplitude scaling is unnecessary if frequency discrimination, such as measurement of resonances, is the only requirement. However, magnitude scaling is often critical for advanced problem solution, especially in cases of trending, animation or modeling.
Without traceability to an absolute physical standard, the reliability of a non-traceable vibration transducer (and the data acquired) is of limited value. Correct and meaningful vibration transducer calibration ensures traceability to an absolute physical standard, which provides a defined degree of confidence in all of your vibration measurements.
Calibrating a vibration transducer at just one frequency will provide the vibration engineer with the sensitivity of the transducer. However, it will not reveal anything regarding the usefulness of the transducer at other frequencies. True confidence in the performance of the vibration transducer can only be obtained by calibrating the sensitivity at more than one frequency. Your transducer should be calibrated over the entire specified frequency range to ensure that the transducer has not been damaged. Transducer damage will typically show up as irregularities in the Frequency Response Function (FRF) curve. The 9155 system detects any irregularities by recording both magnitude and phase at each tested frequency.
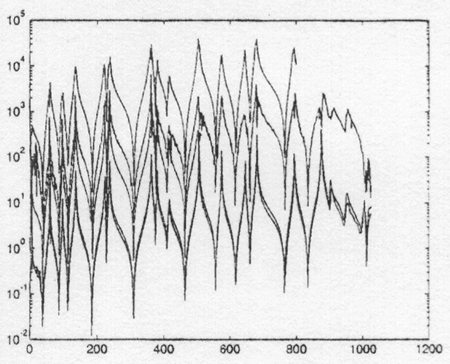
Studies at both the Imperial College of London and the University of Cincinnati have confirmed that improper scaling is a common error in acceleration frequency response measurements [1,2]. This figure from UC’s vibration course clearly indicates this. All measurements were taken from identical points on the same structure. The difference between curves are calibration errors. Users need to obtain and use proper calibration values to eliminate this problem.
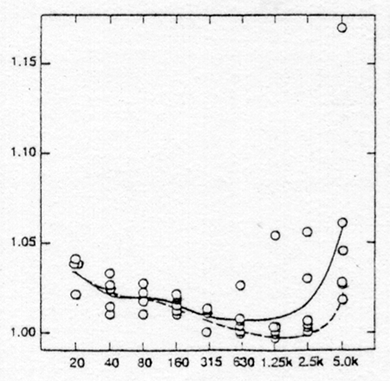
There are many ways to calibrate an accelerometer: gravity, fixed frequency/amplitude handheld exciters, reference standards, and reciprocity. Each of these methods relies on additional equipment to provide a scaling value for an accelerometer under calibration. When not controlled properly, significant variances occur in measurement. The figure below from an Australian National Measurements Laboratory round-robin study shows variances in calibrations performed by accredited calibration laboratories [3].

This round-robin report concludes that uncertainties on the order of 3% can be expected. Uncertainty increases at smaller accelerations and lower frequencies. Even among participating laboratories, results from several had to be dismissed where “due care” with instrumentation or documentation had not been taken.

If these calibration laboratories can err, it becomes obvious that control and traceability is extremely important. Typically, a certified lab should expect uncertainties at the reference frequency to be less than 2%. This is why the ISO 9001 and 10012 standards specifically concentrate on ensuring adequate calibration controls. Instituting a program based on calibration standards, like ISO 16063-21, helps to ensure quality in measurements.
If measurement is a part of your job, consider establishing a controlled, traceable program for your equipment. The Modal Shop calibration systems and PCB reference sensors will provide a strong foundation for your program. Don’t let complicated standards or jargon deter you. We will be glad to provide assistance in creating a calibration program.
References:
[1] Allemang, R.J., “Vibrations: Experimental Modal Analysis”, University of Cincinnati, 1995, pp. 4-27
[2] Ewins, D.J., Griffin, J., “A State-of-the-Art Assessment of Mobility Measurement Techniques - Results for the Mid-Range Structures”, Journal of Sound and Vibration, Volume 78, Number 2, 1981, pp. 197-222
[3] Clark, N.H., “Accelerometer Calibrations - Who Needs Them”, Volume 17, Number 3, pp. 67